Disclosure: Some links from this article go to an affiliate site. While purchasing through the link costs you nothing additional, it helps fund Domfeed and keep the service free.
If you've been wondering how to start a blog, you've come to the right place! 🚀
In this beginner's guide, I'll explain the basics to get you up and running with your own domain name and self-hosted blog. It's faster and easier than most people think!
TL;DR: If you know what a blog is and you just want to take the fast track to success, we recommend just using the search input to enter a term. We'll show you thousands of recommended names; you can just click, register your domain, and sign up for hosting directly from the results. Already have a great domain name? Click here to get your domain name and hosting.
Contents
- Express overview
- Why start a blog?
- Deciding what to write about
- What is a domain name?
- Finding a good domain name
- Why choosing WordPress makes sense
- Setting up your blog's hosting
- Designing and using your new blog
- How do I get ideas on posts to write?
- Promoting your blog
- Summary
Express Overview
Aside from creating the actual content of your blog, the hardest part is finding a great domain name. A domain name must be unique and should generally represent all your content. While other elements of your blog, such as design and content, may change and grow over time, you should pick a great domain name to start. You wouldn't want to have to change the name and location of your blog down the road.
As there are over 240 million domain names already registered, thinking of one which is clever and hasn't already been registered can be a daunting task. Sure, DollarsAndSense.com, ShoestringBudget.com, and FrugalFamily.com may be great domain names for your financial blog, but the owners of those domain names are unlikely to give them up. 😁 This is exactly why I created Domfeed -- to help people find great domain names for their projects and businesses.
Getting started using Domfeed couldn't be easier.
- Type a keyword your blog is mainly about - e.g., finance.
- From the list of results, click a domain name you like. Clicking will open a new window.
- In the result window, proceed with the purchase of your new hosting and domain name.
- If you already own a domain name or picked out one that's available, you can go straight to the hosting signup page.
Why Start a Blog?
There are a few different motivations people, organizations, and businesses have to start blogs. Whatever your ultimate goal, remember that your immediate goal must be to provide value. Value is the reason people visit your blog. Are your Aunt Martha's cookies 🍪 the bee's knees? Do you have an unpopular opinion on what should and shouldn't be a planet? These topics can provide valuable content to your readers. Poor Pluto.
If your goal is profit, with even a small amount of good content, and a bit of marketing, there is no reason you can't start monetizing your blog right away. A great thing about making money with blogging is that you can also earn what is called "residual income" or "passive income". "Passive income" looks like it means you can do it while you catch up on the latest season of Game of Thrones. This is not true (unless of course your niche is related). Blogging is work, so skip that last season of GoT and start blogging! You'll be glad on both accounts. 😏
Imagine this: you wrote a couple of great articles with eye-catching photos about your Aunt Martha's cookies -- maybe you even took some video clips.
You have a blog article on those fabulous Macadamia-Choco Cookies and you share it on social media. Some of your friends visit your article, have a look around and share your articles with their friends. That's what good friends do. Some friends wouldn't know a good cookie if it hit them in the back of the head. 👩🎤 I'm looking at you, Karen.
Who needs friends when you have $20? You decide to buy an ad on social media. Three days later your ad is viewed by thousands and a percentage of those convert and view your articles! Success!
While you're describing how to make these delicious recipes, you're also telling readers about your Speedy-Mix 2000 versatile mixer and your EverSharp AX silicone spatula. You throw in an affiliate link for these items to Amazon, and next thing you know, there's a couple of hundred dollars sitting in your affiliate account. The gourmet ChocoChunks you use in the recipe are amazing also, so you decide to throw in an affiliate link to those also. Mo' money!
Now, a year has gone by, your 10-recipe blog now has over 200 recipes, and you're getting 10,000 views a day. You're a success. The article you wrote a year ago is still earning you income -- residual income, and your newer articles seem to be doing just as well. Some of your advertisers then start to see your blog is a quality investment, and ask you to review their product, or pay you to bake a batch of cookies with their Norman's Never-Sift Flour. Sweet.
This is what makes blogging so fantastic and this is why creating valuable content is important.
Deciding what to write about
The first step in the process should be deciding what you have to offer the world; this is your niche. Fashion, travel, DIY, food -- if people have an opinion on it then you can blog about it. Some folks just start a JohnDoe.com blog and write about their daily lives. You can do this also, and your niche would people like you, or are interested in people like you; whether they be bearded bikers who love to cook gourmet food, a single woman trying to find love in Cleveland, or a city-slicker who loves squirrels.
Tip: Some niches are more popular than others, such as relationships, parenting, fashion, self-improvement, finance, and pets. Choosing these niches have both an upside and downside Many people will be interested in your subject matter, but there will be more competition for your audience as well.
Writing about what you love will make the process a lot easier; you will be motivated to both read and write and you're probably already fluent in the subject.
Your content should be able to entertain, educate, and generally help your readers. You are not writing to add more words to the Internet -- you are writing to give your readers value.
Note that adding your own photos on your posts will go a long way on your users enjoying the article. Do not use other people's images (or other content) unless they give you permission. For a great list of where to get free images for post cover images, check out the resources page.
What is a Domain Name?
Every site you can visit on the Internet has an IP address -- much like a phone has a phone number. Nowadays, most people don't use phone numbers; you store references in your phone to those numbers, like "Bob Office" or "My Honey", and you use those to call the person. Don't get them mixed up, or you could wind up in an embarrassing situation!
An IP (version 4) address is a group of four numbers that look like this: 8.45.95.125. Instead of typing those numbers (or having to look it up if the address changed), there are registrars which allow users to rent a name to map to their site. So, when you register SethInSandals.com, you give people a nice, easy way to remember and find your site.
Wait, did you say rent? Yes, I did.
While many people refer to it as "buying" a domain name, you must pay registration for a certain time. If you did not renew after, the name would expire and would be again available for registration.
Warning: Though this doesn't happen as much present day, there have been many people who let their domain names (sometimes unknowingly) expire, and have not been able to reclaim them. Be sure your registrar has your correct email address.
Finding the Perfect Domain Name
The first step, as with any other project, should be brainstorming. Get a pen and paper and jot down anything and everything related to your subject. There are no bad ideas at this stage -- rule out nothing -- just jot it down. You should have some good ideas at this point what to name your blog.
As there are over 240 million domain names already registered, thinking of one which is clever and hasn't already been registered can be a daunting task.
Type the name into the search box above and check if your top names are available.
Hopefully the names you came up with aren't already taken, but if they are, just type a few of the keywords you came up with and the search results should give you a great name -- or give further inspiration.
Clicking one of the domain results will get you started registering your domain and hosting with BlueHost.
Good Domain Names
There are a couple of characteristics your domain name should and shouldn't have in order to be considered a "good domain". These are just guidelines and of course, there are exceptions.
Your domain name should be short. - Yes, some sites are wildly sucessful with their long names, but this is usually because they are clever. Some marketers haves started to jam a bunch of keywords together, like BuyBestCheapVacuums, to get better search engine placement. However, search engines have gotten wise to this and have began penalizing them -- actually placing them lower in the results. Your name can be clever, but not too much so. - StitchingTime.com is a great name for a sewing blog, but having to spell or explain your domain name to people isn't fun for the speller or spellee. This point is less important in modern day, as usually when you first see an address, it's on a screen. Again, there are many exceptions. Fiverr.com, a site for freelancers starting at $5, is hugely successful. Avoid special characters. - Adding numbers or dashes, like Fight4Change.com or Heathrow-Agents.com is domain name death unless you also purchased the alternative spelling of the domain names. Exceptions like 360.com, which sold for $17 million, do exist here also. Your domain should be memorable. - You don't want your audience racking their brains to remember the name of the site they found your great article. "Was it ToteabilityFashion? TotablyFashionTotes? Tota-something, I think." ToteSmart is better.
Premium Domains
What is a premium domain? Well, by definition, it's just a domain which costs more.
There can be several reasons it's a premium domain. Usually it's because the name is of a very popular generic term -- like Beer.com which sold for $7 million in 2004, or Voice.com which sold for $19 million just last year. Yes, those are millions of U.S. dollars.
Back in the 90's, before everyone was on the Internet (or when the Internet was just formed), you could easily buy a great domain name for your site. Now, with over 240 million registered domains, this is a bit... harder. Like any other commodity premium domain names are a matter of supply and demand. Someone else has it, and depending how badly someone else wants it usually determines the price. This is what makes premium domains so valuable.
Note: Premium domains besides the .com, .net, and .org top-level domains (gTLDs) can exist without being pre-owned. Alternative country-level and generic top-level domains (ccTLDs & newgTLDs), such as .io, .pizza, etc., are priced by the organizations which own them and be can set at any price.
Why are premium domain names better than regular domain names?
Simply put, they aren't. If you can find that awesome name for your blog without paying a premium, go ahead and do it. However, if you find a name which fits well with your project and you can afford it, you may want to go ahead and grab it. Here, at Domfeed, we offer premium domains for many niches like Extatique.com, Neika.com, and VeggieDelight.com.
Why choosing WordPress makes sense.
If you've given any thought to starting a blog or website, chances are you've already at least heard of WordPress -- there is good reason. WordPress is free, versatile, powerful, and 35% of all sites on the Internet are built on it. Sure, there are others - Ghost, Drupal, and Keystone, to name a few -- but none other can claim the amount of project contributors, users, plug-ins, tutorials, or resources.
It's a great place to start (and perhaps use indefinitely) because it is simple to use and can be set up and extended in minutes by someone with few technical abilities. You can even turn your blog into an eStore by simply adding the WooCommerce plugin.
If you've ever used Microsoft Word, WordPerfect, OneNote, or EverNote, you already have the basic skills you need.
Setting up your blog's hosting.
Your blog has to live somewhere on the Internet where the public can access it.
There are many, many options when it comes to hosting providers. As a beginner hosting your WordPress site, you really need three criteria; it has to be reliable, it has to be fast, and you need good tech support.
For this tutorial, we will be using BlueHost.
- Recommended by WordPress
- Based in Orem, Utah.
- Offer unmetered bandwidth -- they won't charge more as your site gets more traffic.
- Has 24/7 support if you have questions or issues.
- Automated WordPress install -- just a 10-minute sign-up and you're ready to blog.
- Money-back guarantee.
Note: While there are free hosting services, such as Medium and Blogger, it is difficult to monetize your posts or to migrate to your own self-hosted blog later.
Now, on to the fun parts!
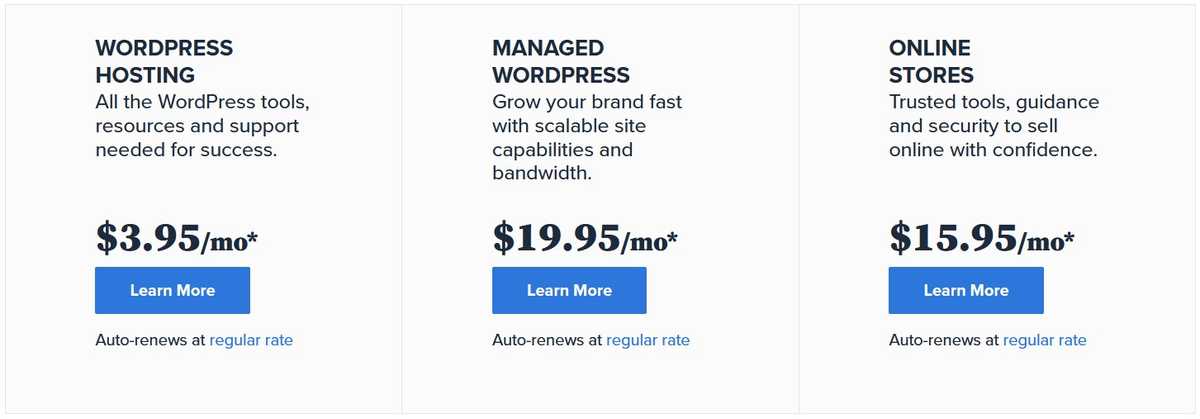
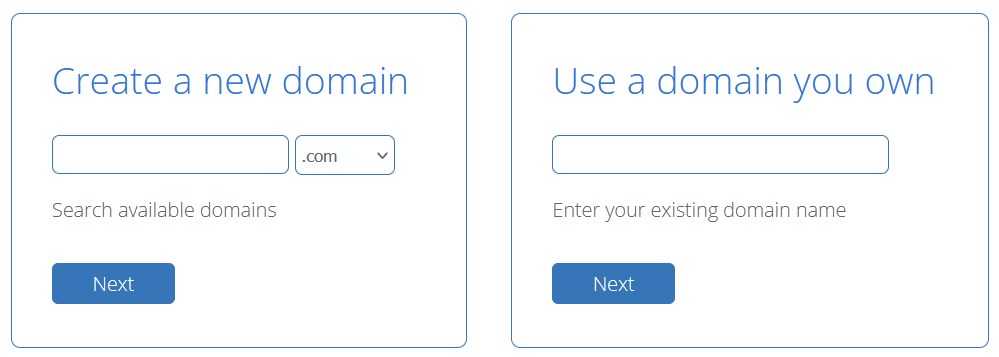
Either use our search field to find a domain name and click on one you like or head directly over to BlueHost. Once you are on the BlueHost getting-started page, click the green Get Started button. Choose a hosting plan. It is recommended to choose the Choice Plus plan; you get a bunch more features than the Plus plan for the same price. However, the cheapest plan will get you up and running just fine.
If you don't already own a domain, enter the domain you want in the first box.
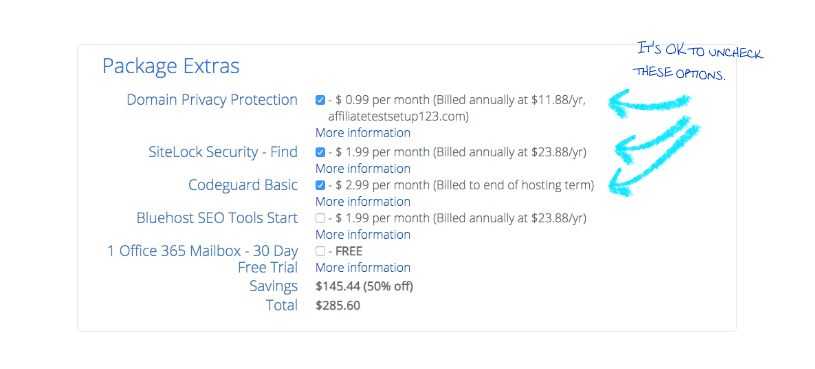
You can safely opt-out of any of the listed options.
Enter your account information and your billing info, and you're done with sign-up!
How do I get ideas on posts to write?
If your blog is about Aunt Martha's cookies, you already have the 25 recipes she gave you. Don't stop there, though! You can also write many related articles such as;
- Ingenious Ways to Keep Your Kitchen Germ-Free
- How Gourmet Chocolate Saved My Cookies
- How to Pick the Best Blender
- Everything You Ever Wanted to Know About Flour
If you don't have a collection of things you already want to blog about, there is still hope! Chances are, if your niche is already something you are interested in, you can thoroughly enjoy researching your post. This method will also work if you have no interest at all in your niche -- but then it becomes work.
Pro tip: When writing your articles, you may think about writing evergreen content. These are articles which will never stale and people reading these article years from now will still find them beneficial. This will save you from having to write and re-write articles because they are outdated.
The best way to find articles, if they aren't already popping up in your head, is to just Google some keywords in your niche. Your blog is about making cookies -- Google "making cookies". Click on a couple of the links.
Tip: For this step, skip the paid results (usually have the word "Ad" next to them). Not because people who pay for advertising are bad -- we just want to see the ones which made it to the top organically (i.e, without paid advertising).
Use these sites as case studies. What are the titles of their posts? How many words are there in the post? How are they making money? What are they advertising. Why am I clicking?
The next step is to take a title which interests you, and run that through a search engine. Browse a couple of the articles on the same subject from different site, and take notes on the outline of the articles and some interesting points. Using the outline you created, fill in the blanks with your own writing, and before you know it, a post is born!
Some articles which do well are;
- How to articles - How to Make the Perfect Dough
- Listicles - 10 Things You Can Do to Become a Better Cook
- Reviews - Is the Blend-O-Matic the Best Kitchen Blender?
- Comparisons - My Pick for Best Iron Skillet Surprised Me
Pro tip: You can also hire copy-writers on freelancing sites, but note you usually get what you pay for. Spend $10 on an article and chances are it will be a bland article with bad grammar which you will have to re-write anyway. However, when your blog becomes popular and is making money, you may want to invest a $100 each or more to get more quality articles. Create a "Write For Us" page to tell authors what you expect in terms of content.
An important aspect of your blog is consistency. You should aim to publish at least two new articles a week.
There are also some basic pages which your blog should have, such as a "Privacy Policy" page, a "Disclaimer" page, and other pages which may be required by the country the site is hosted in, or required by any affiliates you will sign up with if you choose to monetize your blog. There are many template-makers online to customize "Privacy Policy" pages.
Designing and using your new blog
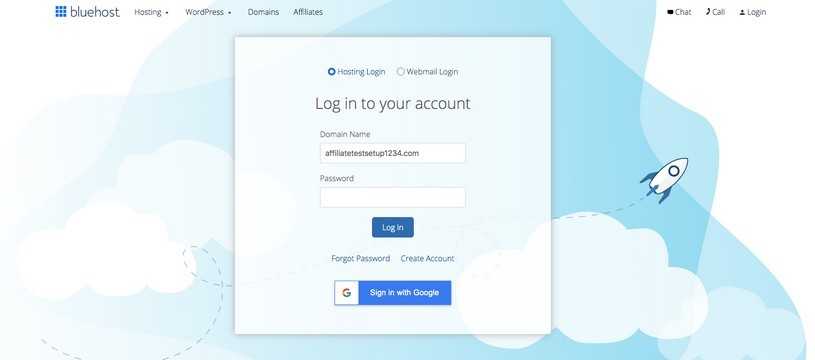
Log into your BlueHost account if you haven't already done so.
You now have two things; a host and a blog. The host, BlueHost, has the machines which your blog will sit on, while your blog is an instance of WordPress. You could have many blogs or sites on the same hosting account. For example, if you owned SethInSandals.com and YummyCookies.com, you would log into your BlueHost account and be able to see and manage both sites. I explain this because you may have multiple accounts (and multiple passwords).
Let's set up your first and only blog.
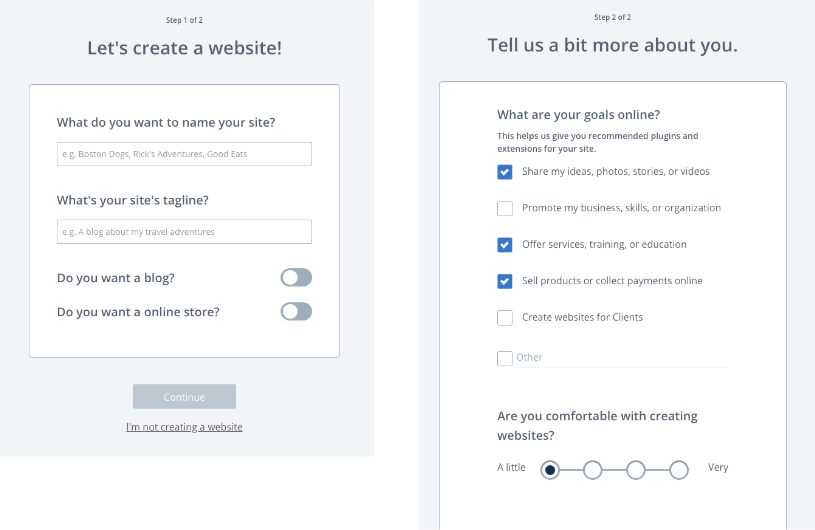
- Enter a name for your new blog, for example, "Seth in Sandals".
- Enter a brief summary, or tagline about your site, for example, "A Foodie Invades the Tropics". This tagline may appear below the title in some WordPress themes as well as other places.
- Check/enable any of the options you need. This is unimportant at this point becauese it is extremely easy to change your options and plugins at any time.
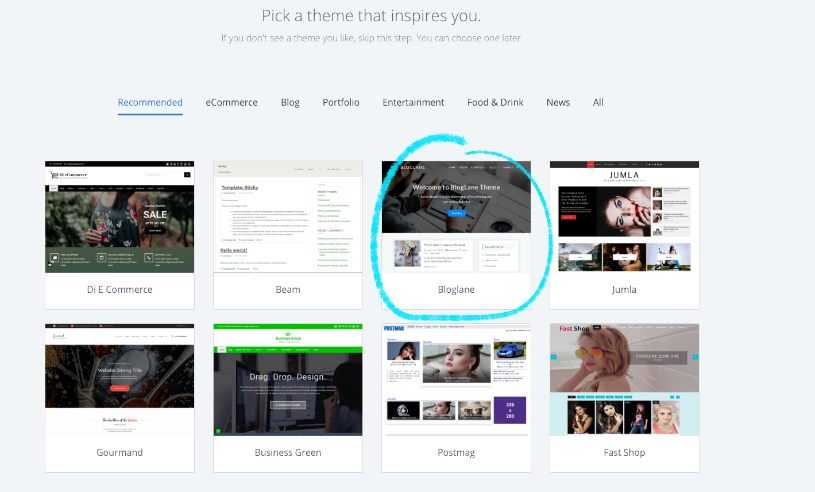
- Choose a theme for your blog. For now, you can choose the Bloglane theme or any other, as we will change it in just a couple of minutes.
- After you choose a theme and click the button to continue, WordPress will be installed and customized with the theme and plugins you chose.
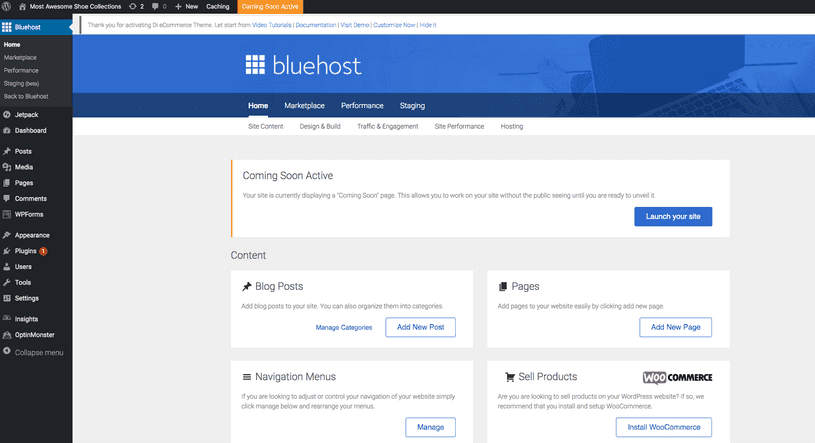
- You should now be in your BlueHost cPanel -- or dashboard. Here, you can view some of the basic tools and statistics of your account. You will also see your blogs listed.
- Click the Log in to WordPress button, and you are in like Flynn!

Tip: You do not have to log in to your BlueHost account to modify your WordPress instance (i.e., blog). You can place a Log In link into your blog, or better yet -- when you want to modify your site, append /wp-admin to the end of your domain name in your browser and click the go icon (or press Enter).
As mentioned earlier, the cPanel is the control panel for your hosting. The screenshot below is the control panel, or dashboard for your WordPress blog. This is the area which controls everything about your WordPress blog -- themes, plugins, content, and all.
WordPress Menus
Settings in WordPress can be accessed in at least three ways. If you click the menu item, WordPress will display a page with the sub-settings, if available. If you hover the mouse over the main item, a pop-out menu will appear. Finally, if you are in the settings page of the item, the sub-settings will be visible.
Let's change the address of our WordPress posts to improve search-engine optimization (SEO) and improve readability.
From the WordPress menu, choose Settings -> Permalinks. The default setting will display your page in the browser using Day and name setting, which looks something like this:
domfeed.com/2020/04/15/how-to-blog
That is just too ugly.
Pick and save the "Post name" setting which will give your post an address which looks like this:
domfeed.com/how-to-blog
Much better.
Install and Manage Plugins
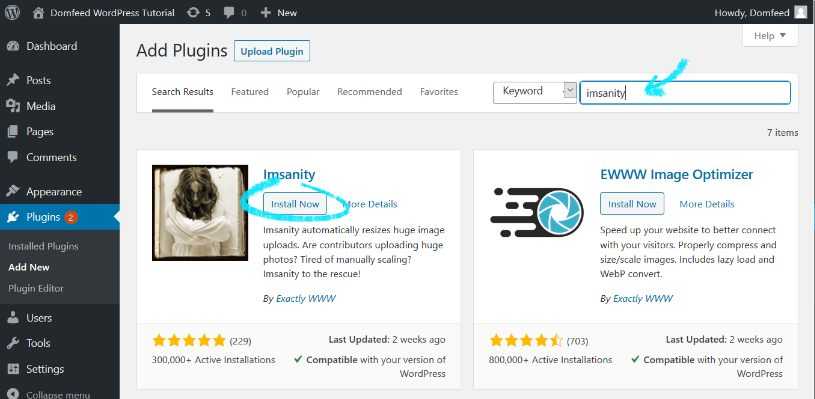
In the WordPress menu, select the Plugins -> Add New option.
In the Search plugins... box, type "imsanity". Click the Install Now button and click Activate after the plugin installs.
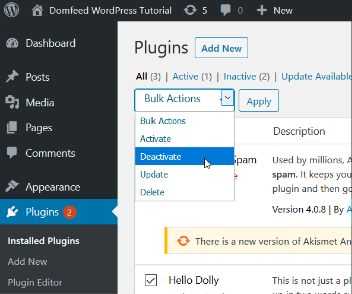
Now, in your plugins list, you will see the Imsanity plugin. You should notice some links in the plugin's section. These links will vary depending on what the plugin's author puts there. In Imsanity's case, there are two links -- Settings and Deactivate. The Deactivate link will temporarily disable the plugin -- for troubleshooting and if you need to store larger images and don't want them automtically resized. There is also a Settings link which will bring you to the plugin's settings page. In the settings page, you can do things such as change the default size of uploaded images.
Tip: Most plugins operate on the "freemium" business model. This means the plugin may provide basic functionality, but upgrading to more useful features or removing nagging messages may cost money. Some plugins are totally free. Before installing a plugin (or theme), make sure you read the reviews and trust the plugin/theme, because they could harm your site.
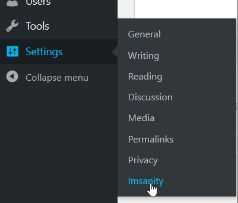
Plugins can also modify the WordPress main menu (as well as anything else in WordPress). If you were to hover over Settings in the WordPress menu, you would notice there is now an Imsanity sub-menu.
As with pages and posts, plugins can also be modified in bulk by listing them, selecting them and choosing actions from the top of the list.
Let's add two more plugins -- Instant Images and Contact Form 7. As a reminder, you can install new plugins by clicking Plugins -> Add New from the WordPress menu.
Headlines & Summaries
Why make a tutorial section just on headlines and summaries? They can be more important than your posts.
"Wait! My post is a well-written, one-thousand-word article with media that covers two-years' research with sloths!"
If people are not interested in the headline, they will not click-through to your article. Writing interesting and effective headlines takes work. In fact, many leading bloggers agree you should spend almost as much time writing the headline as you do the article. Understanding what makes a headline work and what makes a headline fail can significantaly improve your audience.
The best headlines serve as an irrestible offer. They will usually promise something and evoke emotion; curiosity, desire, or even anger. "5 Ways to Make Money Using Your Laptop", "How to Save Money and Still Eat Gourmet Food", and "How to Find a 1950's Husband in the 2020's." are all great headlines -- as long as you deliver the solution in the content.
Tip: Do not use click-bait. "Click-bait" are sensational headlines and images not fulfilled by your content. Having a headline like "How I Retired to New Zealand with $200 in My Pocket" and then later explaining how you also had $1.5 million in a checking account is not going to make for happy readers.
Pages & Posts
When do I use Pages? When do I use Posts? What's the difference between pags vs. posts? Many beginners ask these questions and the answers are easy.
Pages are your semi-permanent information such as your Privacy Policy page, the About Us page, and Contact Us pages. See what I did there with the word "pages"? 😁 Page links will usually appear in menu locations such as a header bar or footer bar.
Posts, on the other hand, are usually categorized articles that will be added as time goes on. They can be added without changing the structure of your blog.
Let's create a new page by clicking Pages -> Add New from the WordPress menu. If this is your first page, there will be a pop-up explaining how the WordPress block editor works. Take a moment to read it.
As mentioned earlier, images are a very important element in storytelling, and none is more important than the featured image. A featured image is an image which represents a page or post. In WordPress, many themes will place this image before anything else in the article -- much like the happy woman blogging away at the top of this article. Some themes will even use this image as a cover image -- a backdrop which may have copy, such as the page title and article modification date, superimposed.
When your article is shared, the featured image will usuallly also be used by social media sites, such as Facebook and Twitter, to represent your article. To manually set featured images, and other search-engine optimization (SEO) settings, you can use a WordPress plugin such as Yoast SEO.
Create a Page
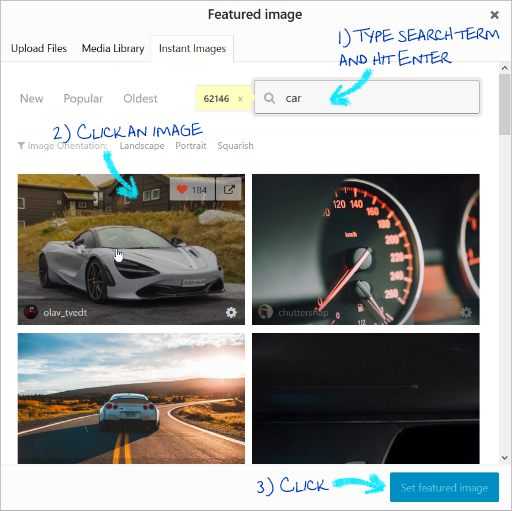
Since this is just a only a tutorial, I didn't take photos and sleect the perfect one that represents my page, like you should do. The first thing we will do is to add is a royalty-free cover image.
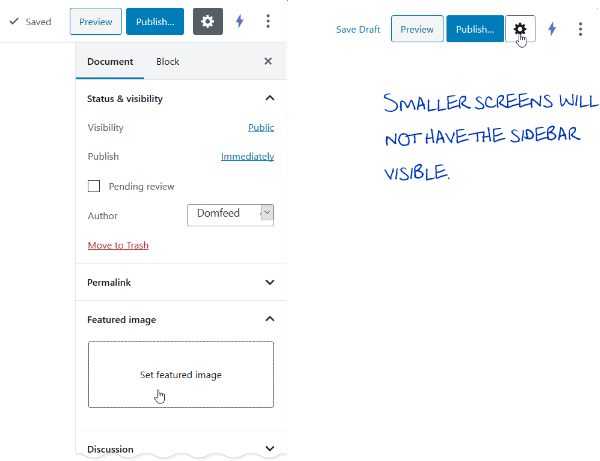
- In the right sidebar, click Document -> Featured Image -> Set featured image. If you have a smaller screen, you may have to click the ⚙ (gear) icon first to show the properties pane.
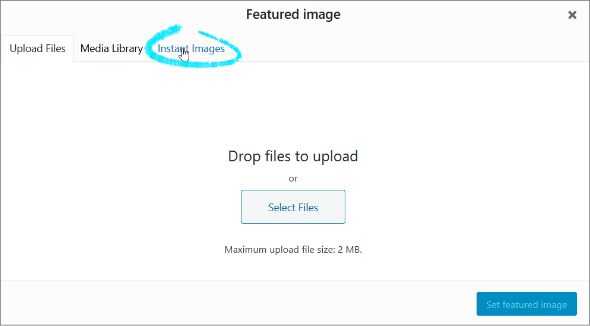
- Click the Instant Images tab, which was installed by the Instant Images plugin earlier.
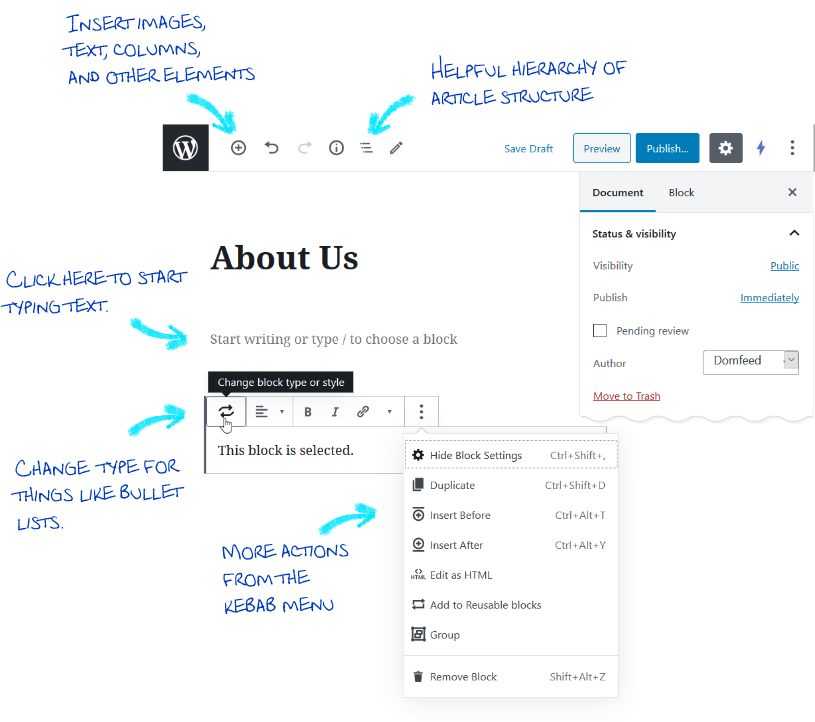
- Next, we're going to ass some content to our page. The image below contains annotations for some of the things you can do on the editor page.
- Click in the Add title box and type "About Us".
- Add some text and images to your page and when finished, click the Preview button. The preview will show what your post looks like with the theme applied.
Tip: Before publishing a page or post, think about the title. If you change the page title after publishing the permalink will not change automatically -- and there is good reason. If people have saved a link to the old permalink, and you change it, they will get a page-not-found (404) error when they try to visit. If you change the title, but not the permalink, you now have a page link which doesn't match the title.
You can change the page.post permalink by clicking the existing title.
- Close the preview window and click the Publish... button.
- The Pre-Publish Check pane will appear. You can modify the visibility to private -- in case an editor should review the page, password protected for subscribers, or public if anyone can see it.
Tip: If you article is not ready to be published, click the Save Draft link instead of the publish button.
Create some post categories
To organize your posts, and to be able to offer your viewers targeted reading, we are going to create some categories.
- In the WordPress menu, click Posts -> Categories.
- For blogs, some useful categories might be things like Featured, Money & Budgeting, Family, DIY, and Road Trips.
- Add a category in the Name field, and optionally a Description. After each category, click the Add New Category button under the form.
Create a Post
In this section, we will create a post. Creating posts are much like pages, except with a few more steps.
- In the WordPress menu, click Posts -> Add New.
- Add a featured image to the post, as you did in the Create a Page tutorial above.
- In the right settings pane click Categories. If the pane is hidden, click the gear icon toward the top of the window to show it.
- You will now have a list of the categories you entered before, as well as a link to add more.
- Check one or more of the categories, although you shouldn't have the Uncategorized category checkbox ticked along with another category. And yes, having a post categorized as "uncategorized" is a thing.
- We are also going to manually add an excerpt (summary) of the post. When your post is shared to social media, by default the first few words of your post will appear under the title. We don't want that (at least, I dont). In the Excerpt box, enter something like: "Called 'Gold on a plate' by critic Artie Gourmet, Chef Julio shares his delicious, award-winning recipe for Chicago-style pizza. Once a meal only for Chicago royalty, this gem can now by enjoyed by your family any day of the week."
- There is also a Discussion section in the document settings. Allowing comments a great way to drive engagement, although you may want to a premium anti-spam plugin which will stop trolls and advertisers.
- Add a title, text, and other content to the post, as you did in the Create a Page tutorial above.
- Publish the post.
Changing your blog's theme
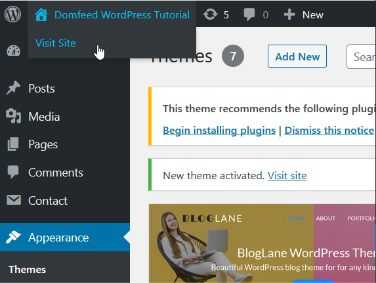
If you haven't already viewed what your blog looks like, you can do so by clicking the name of your blog in the upper-left corner or the WordPress dashboard.
See? Good, let's change it completely.
If you are still in the site view mode, click the name of your blog again to return to the dashboard.
In the WordPress menu, click Appearance -> Themes.
Click the Add New button.
In the Search themes... box, type "ashe".
TBD - Ashe header image not working.
Hover over the Ashe theme in the results and click the Install button. After the installation has finished, click Activate.
If you click the name of your blog once more, you will see you now have a prettier theme installed.
While the blog does look better, it's still not quite what we want. I don't even know those people in the header image! Let's do some customizations.
- In the WordPress menu, click Appearance -> Customize.
- On this page, we can control almost all aspects of our theme. Click Header Image from the menu. Hey! There is on Instant Image option in the media library!
- Close the Choose Image selector. Also close the theme customizer by clicking the X in the upper-left corner. You can also exit the customizer by clicking the Publish button if you have unsaved changes.
- Let's download a stock image and add it to the library by choosing Media -> Instant Images from the WordPress toolbar.
- In the search bar, type "smile" and press Enter (or search by clicking the magnifying glass icon).
- Choose a landscape image by selecting one from the results, or click the word Landscape in the Portrait Orientation to show images whose dimensions are wider than they are tall.
- Click one of the images and it will be downloaded to your WordPress media library.
- From the WordPress menu, click Appearance -> Customize once more.
- Click Header Image and click the Add new image button.
- Click the Media Library tab under Choose Image.
- Select the image you just downloaded and click the Select and Crop button. Don't worry about your original image -- a copy of the image will be created just for the header image.
Promoting your blog
Before promoting your blog, it's a good idea to create several "pillar articles". "Pillar articles" define what your blog is going to be about -- not any kind of grandiose mission statement -- just well-written articles with some good media. These articles will show your audience what they can expect from your site. Every article doesn't have to be a masterpiece, but you should be showing your readers that your blog is capable of providing valuable content.
Now that the preaching is out of the way, let's move on.
- Comedian Steve Martin was quoted as saying "Be so good they can't ignore you." This is the best way to promote your content. When someone reads your article, they can't help but share. Have you ever seen a Facebook commercial? No, they don't need one.
- Spark Emotion. If you can get your audience to feel something, you are probably on your way to a successful blog. I had actually read this on a book about seduction. The opposite of love is not hate -- it's indifference. Build relationships with your viewers.
- Make it attractive. Sure, Wikipedia is a great source of information, but it's hardly easy on the eyes. I could not begin to count how many pages I have opened and closed within seconds because of a pop-up, horrendous colors, or spammy ads.
- Make it easy to share. Forcing your audience to copy and paste the address of your post and then share it on social media is just mean. Include share widgets so that users can just click a button and instantly share your post. The more genius marketers I have seen also include things like a choice of custom-designed pins users can click to share.
- Collect email addresses. Direct mailing is one of the best ways to re-market your viewers. Set up a small form on your site and ask people for their email addresses. You should offer some premium content or mother incentive to do so. Every couple of days, send them informative snippets and summaries linking to your blog posts. Do not send them spam or they will surely block you. If you have enough people block your emails, email services will begin blacklisting your emails and will go into people's spam folders automatically.
- Social media. You just wrote a new article? Tell your friends, ask them to share. Pay for targeted ads. Join groups on Reddit, LinkedIn, and Facebook which are related to your niche. If it's OK with the group, post a link to your article. Summary
Congratulations on starting your blog! In the near future, we will publish other helpful articles Such as "How to Make Money with Your Blog". Please join our mailing list to stay informed!
If you come across errors or have any issues with the tutorial, please email support@domfeed.com and I will provide personalized help.
